by Briscoe White | Dec 10, 2010 | Life on the Farm, Miscellaneous |

Now that fuel prices have risen to such high prices, heating a greenhouse has become an economic hardship. For twenty years we happily burned LP gas for heat and felt we were not only economical but also being kind to the atmosphere. As fuel prices began to increase a few years back, we began to explore new fuels to heat our greenhouses.
Being in a rural county in which logging is the second largest industry after farming, we knew wood was our fuel of choice. It requires some work, but wood costs have been about twenty percent of LP gas cost. The two things we had to get used to was stoking the furnace and getting used to the blue- black column of smoke rising from the nursery. It was hard for us to believe wood was more environmentally friendly than gas, which makes no visible exhaust.
Further research found on the Office for Resource Efficiency website, has proven that wood is better environmentally even if it does look worse. Wood carbon is already here with us where as fossil fuels are adding carbon that has been in deep storage for eons. LP gas is methane that is about twenty five times the greenhouse gas carbon is. Gas escapes to the atmosphere from the well to pilot lights and reeks havoc in the atmosphere. So even though it stinks and our clothes smell like wood smoke, it is the better fuel.
Lastly we had to reconcile our love of trees with the huge piles of wood we burn. We worked out a deal with a local logger where they cut the slash for us. Slash is the limbs and smaller trees that are normally left in the woods, so we feel we are not responsible for cutting trees just for us. This is not a perfect system but it does remind one of the old days. Fuel is cheap, so turn up the heat!
by Briscoe White | Dec 8, 2010 | Herbs, Recipes |
Looking for a great appetizer to kick off your holiday meal? Try this great recipe we found on the Tortuga Rum Company’s website and give your family something to rave about with fresh Mojito Garlic Holiday Scallops! Not just great in drinks– who knew Mojito Mint could be so versatile? Give the gift of mint with our potted Mexican Chicken Pot, complete with Mojito Mint to spice up your holiday!
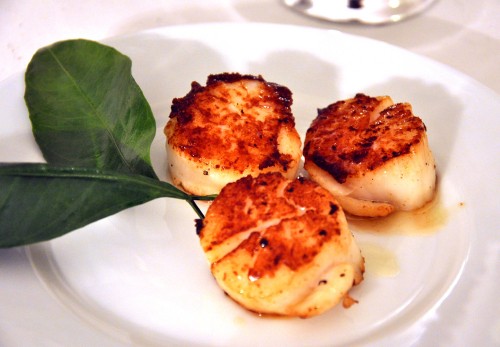
Mojito Garlic Holiday Scallops
* 20 Large Sea Scallops
*1/4 Cup of Butter
* 6 Minced Garlic Cloves (For a more subtle Garlic flavor, try our fresh Garlic Chives instead!)
* 4 Large, Chopped Scallions (Our fresh Chives can also be substituted for a less intense Onion taste)
*1/4 Cup of Light Rum
*1/4 Cup Finely Chopped fresh Mojito Mint leaves
* 3 Tbs. Key Lime Juice (or Fresh Lime Juice if Key Lime isn’t available)
* 1 Tso. Sugar
* 1 Tsp. Salt
* 1 Tsp. Ground Black Pepper
(For those of you who like it hot, try adding Red Pepper Flakes or a drizzle of hot sauce to kick things up a bit!)
1) Rinse the scallops in cool water and pat dry. Melt the butter in a large skillet over medium heat and saute` the garlic and scallions for about two minutes.
2) Once lightly brown, add the scallops and saute` for three minutes, then flip and cook another three minutes on the other side. Once tender, move the scallops to a plate and cover while you prepare the glaze.
3) Over medium to high heat (depending on your stove), combine rum, fresh Mojito Mint, lime juice, sugar, salt and pepper and stir until it begins to boil. Continue to stir for another three minutes, or until the sauce begins to thicken.
4) Stir in scallops gently and turn the heat off. Make sure the scallops are each covered in the glaze.
For a holiday garnish, use some of the fresh Mint leaves and place some Pineapple Sage or Bergamot to add a great green and red accent!
This is a great dish to serve by itself as an hors d’oeurve or you can make it a main course by serving it on a bed of rice, pasta, cous cous or salad! ¡Buen Provecho!
by Briscoe White | Dec 6, 2010 | Herbs, Life on the Farm, Recipes |

On the First Day of Christmas, if your true love gives you a partridge in a pear tree here’s how you can prepare it! Using a variety of our fresh herbs here’s a modern twist on a traditional dish that has become one of our favorites!
Roasted Partridge with Pear Salad
Serves 2
* 2 Partridges
* 5 Celery Stalks
* Sea Salt
Soak
* 4 Cups of Hot Water
* 1 Fresh Bay Leaf
* 1 Tsp. of Fresh Thyme
* 1 Sprig of Fresh Rosemary
*5 Chopped Fresh Garden Sage Leaves
* 1/4 Cup of Sea Salt
* 1 Lemon or Lime for Juice and Zest
Sauce
* 2 Tbs. Unsalted Butter
* 3 Tbs. Demi-Glace (store bought, or use our Bouquet Garni Kit to grow and make your own!)
* 3 Tbs. Apple Brandy
* 1 Tbs. Cider Vinegar
* 1 Minced Shallots or Chives
* 1/4 Tsp. Cinnamon
* Sea Salt to taste
1) Combine ingredients for soak with 4 cups of hot water. Stir and let cool to room temperature.
2) Once cooled, submerged partridges in soak mixture and refrigerate overnight.
3) Once refrigerated, preheat oven to 425 F degrees and pat partridges dry. Let sit and warm to room temperature for 25 minutes.
4) Stick 1/4 of a lemon or lime (or for a less acidic flavor, try using fresh Lemon Verbena) into each of the partridges. For a saltier taste, add a pinch of salt to each bird, otherwise the soak will have made them somewhat salty.
5) In an oven-proof pan, make a bed of the celery stalks in the bottom of the pan to lay the partridges on top for roasting. Oven roast for 35 minutes. Make sure meat in the center of the bird is around 155 with a meat thermometer to avoid illness.
6) Remove the celery and partridges from the pan and melt butter over medium heat. Saute shallots until slightly brown and add the ingredients to make the sauce. Stir well to combine each ingredient and let simmer until well cooked through, before turning off the heat completely.
Pear Salad
Serves 2
* 2 Asian Pears
*1 1/2 Cup of Walnuts (You can also used candied walnuts)
* 1 Cup of Goat Cheese
* Arugula, add more or less to your liking.
1) Wash and shake Arugula dry and add to bowls.
2) Dice pears and sprinkle over Arugula.
3) Add walnuts and goat cheese to your liking.
by Briscoe White | Dec 2, 2010 | Growing, Herbs, Life on the Farm, Miscellaneous |
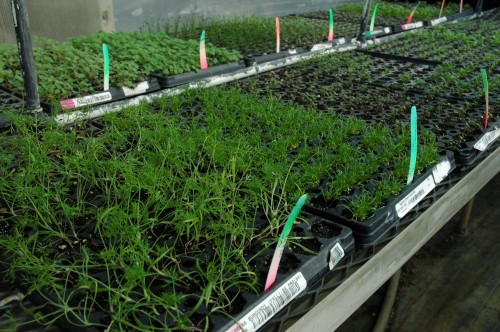
Our seedlings are growing strong to ship to your door!
Temperatures are dropping outside and everyone is gearing up for the holidays, but here in the greenhouse, we’re thinking only of spring! Our slow-growing seedlings have been germinating and getting ready for weeks, and they’re just about ready to transplant and stretch their young roots. With help from our flat filler, thousands of new seedlings will soon move on up to their bigger pots!
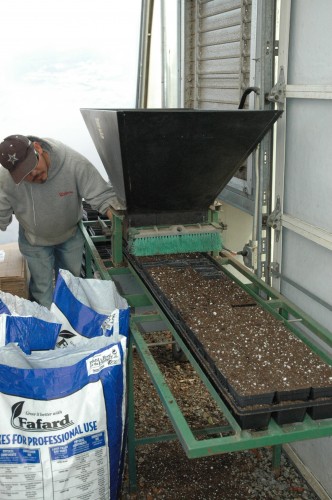
Ino working hard in the greenhouse!
Slow-growing plants like Chives, Feverfew, White Sage and Vervain can take weeks, months, or even years (if it’s Bay) to mature enough for transplanting. Here at the Grower’s Exchange, we take our time with our young seedlings, patiently watering and waiting for the day when they can ship out to your door.
These little plants will be waiting and ready to be added to your garden in March. Stay tuned for growth updates!
by Briscoe White | Nov 30, 2010 | Gardening, Life on the Farm, Wildlife |

One of our smallest employees at The Growers Exchange!
Our babies have arrived! Our Praying Mantis eggs have hatched! For those of you who didn’t catch our previous blog on natural pest deterrents, we collected Praying Mantis eggs from the cedar trees we use as a wind break and placed them in our greenhouses. While looking at the Comfrey today, we noticed the little Mantises crawling all over the leaves! We looked at the egg sac above the Comfrey and it had hatched. We even found one with a small beetle! Great work little guys, we’re glad to have you on our green team!
Speaking of Comfrey, we have lots that are now going dormant but still have strong root structures. These plants will establish over the Winter and appear in Spring as much bigger plants. For any gardeners still looking for Comfrey this season, we’re putting them on sale soon so keep an eye on our site– and we know they’ll be bug free because we have our little friends tending them!


